Thursday, August 10, 2017

Run Android Apps in Chrome Browser in Windows, OS X and Linux


Unofficially, now it is possible to run any Android app in Chrome browser on Windows, Mac and Linux!!
Here is how you can make it work.
Step 1 - ARChon runtime setup.
  1. Create a folder in desktop ex: chrome app etc
  2. Download ARChon runtime vladikoff-archon runtime zip and extract it in chrome app folder
  3. Open Chrome browser and go to the extensions manager by chrome://extensions/ or Menu > More Tools > Extensions
  4. Enable the Developer mode at top right corner, if it is not already enabled
  5. Select "Load unpacked extension".
  6. Choose the folder containing the ARChon runtime you unzipped earlier, Select it and press "Ok"
The ARChon runtime will now be listed in extensions in Chrome. There may be couple of warnings like below image. However, these are normal and shouldn't affect your ability to run Android apps.


Step 2 - Convert .apk file to compatible with chrome


By chromeos-apk!! 

  1. Copy your .apk file where you can find it
  2. Install Node.js (via http://nodejs.org/) (Ubuntu might need sudo apt-get install lib32stdc++6)
  3. Install the tool (might need a sudo prefix):
  4. npm install chromeos-apk -g OR sudo npm install chromeos-apk -g
  5. Run chromeos-apk [path to apk file] 
  6. Example: For Phone: chromeos-apk com.yourapppackage.android.apkFor Tablet: chromeos-apk com.yourapppackage.android.apk --tablet
  7. This will generate a directory as com.yourapppackage.android
  8. Open the Extensions page in Chrome by chrome://extensions/ or Menu > More Tools > Extensions
  9. Select "Load unpacked extensions".
  10. Choose the folder com.yourapppackage.android from directory
  11. The app will now appear in Chrome extensions list with launch button
    Click on it and you are all set!!

Or

By Twerk!!

  1. Download and install Twerk from Chrome web apps
  2. Launch Twerk 
  3. Drag and drop an Android .apk file from your desktop into the main Twerk window.
  4. Set your preferences for how the app should run (portrait mode, tablet mode, etc.) using the sliders.
  5. Tap the pink Android button and a directory as com.yourapppackage.android is ready to be installed as an unpacked extension.

Settings:

  • Set custom name and icon
  • Package for ‘Archon’ or official runtime
  • Set tablet or mobile layout
  • Set landscape or portrait mode
  • Toggle scaling (may prevent some apps working)
  • Toggle SD Card support
  • Set offline functionality

Sources:

- https://github.com/vladikoff/chromeos-apk
- http://www.omgchrome.com/twerk-chrome-archon-apk-maker-desktop/


Sunday, July 30, 2017

Basic Use of Monkey Command


Before we proceed to the topic, what is Monkey and its commands?
The Monkey is a program that runs on emulator or device and generates random user events such as clicks, touches or gestures, as well as a number of system-level events.
We can use the Monkey to stress-test an applications, in a random yet repeatable manner.

Overview


Monkey is a command-line tool that that we can run on any emulator instance or on a device. It sends a pseudo-random stream of user events into the system, which acts as a stress test on the application software.
The Monkey includes a number of options, but they break down into four primary categories:
  • Basic configuration options, such as setting the number of events to attempt.
  • Operational constraints, such as restricting the test to a single package.
  • Event types and frequencies.
  • Debugging options.
When the Monkey runs, it generates events and sends them to the system. It also watches the system under test and looks for three conditions, which it treats specially:
  • If we have constrained the Monkey to run in one or more specific packages, it watches for attempts to navigate to any other packages, and blocks them.
  • If application crashes or receives any sort of unhandled exception, the Monkey will stop and report the error.
  • If application generates an application not responding error, the Monkey will stop and report the error.
Depending on the verbosity level we have selected, we will also see reports on the progress of the Monkey and the events being generated.

Basic Use of the Monkey


We can launch the Monkey using a command line on development machine or from a script. Because the Monkey runs in the emulator/device environment, we must launch it from a shell in that environment. we can do this by prefacing adb shell to each command, or by entering the shell and entering Monkey commands directly.
The basic syntax is:
$ adb shell monkey [options] <event-count>
With no options specified, the Monkey will launch in a quiet (non-verbose) mode, and will send events to any (and all) packages installed on target.
Here is a more typical command line, which will launch application and send 500 pseudo-random events to it:
$ adb shell monkey -p your.package.name -v 500


Source:
- https://developer.android.com/studio/test/monkey.html

Tuesday, March 1, 2016

How to Manage Test Cases with Test Rail

Introduction
From past few years, agile process became the core of the software development process. In  this process every phase of the software development life cycle (SDLC) moves in parallel.
Requirements pushed by client, development corresponding to the requirements, and testing on the developed section all goes in parallel streams.
Testing team is responsible to reform the raw requirements from client into executable test cases and testers have to execute the test cases as well as they have to file bugs for the failed scenarios. In the meantime if the requirements keep on changing and it becomes very difficult to recreate and modify test cases as well as to manage older requirements for reference.
To make tester’s life easy, so many tools were introduced (Pivotal tracker, Podio, JIRA, Test Rail etc.)
Test Rail is the one which provides the facility to manage the test cases in the best way. It also provides the privilege to the tester to execute test cases and file bugs into JIRA corresponding to the failed test cases.
Test Rail
Now,  when it comes to managing test cases and performing actions like execution, modification, and bug reporting  for the failed test cases, “Test Rail” is the best tool to do all these actions. This tool can integrate perfectly with JIRA and provide facility to  testers to create JIRA tickets directly from Test Rail. In addition, it is very easy for a tester to map the failed test cases with the JIRA tickets with the help of this tool.
Starting with the basic flow of Test Rail
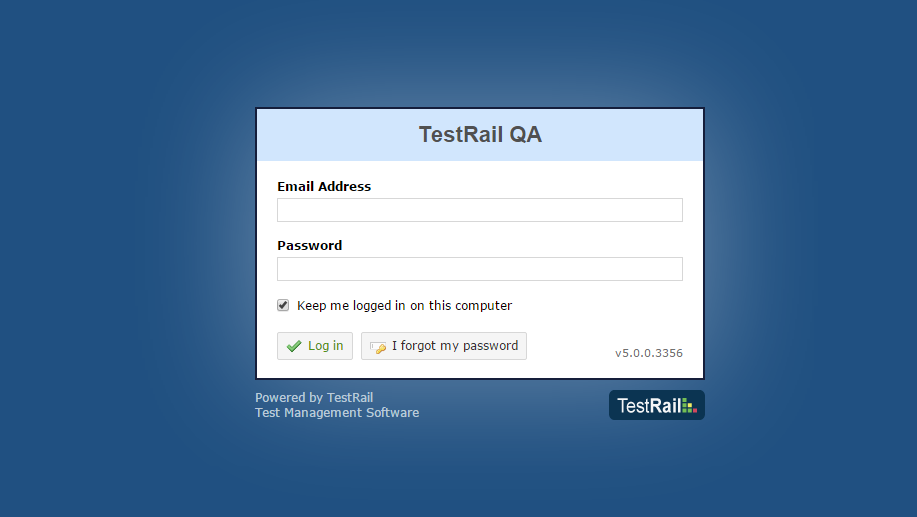
Login with valid credentials.
Login with valid credentials
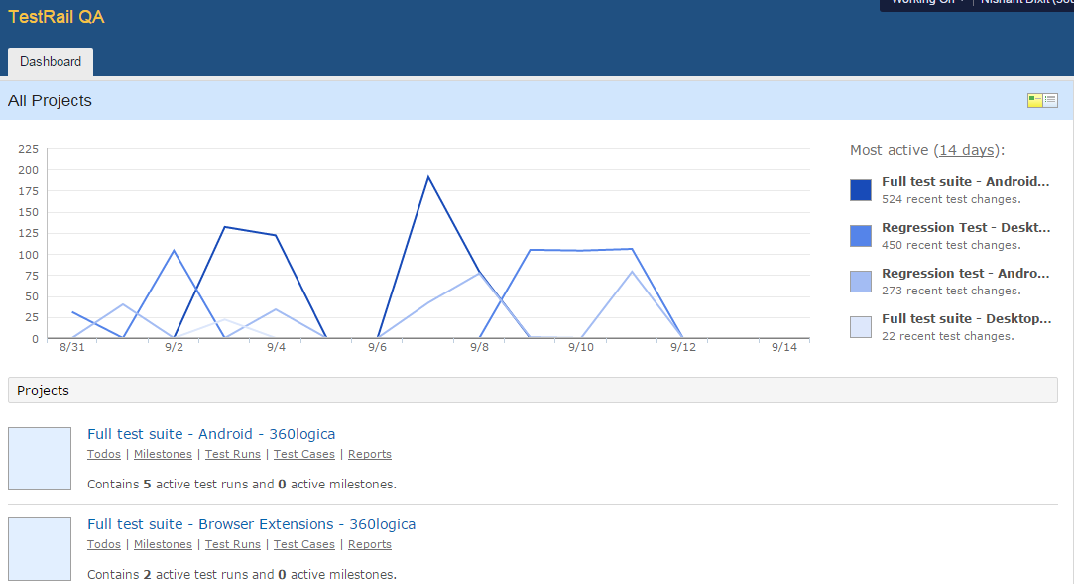
After login in the Test Rail, user will see the dashboard containing a graphical representation of the status of all projects along with the links of the projects from where users can go to the corresponding project’s test cases.
Status Dashboard
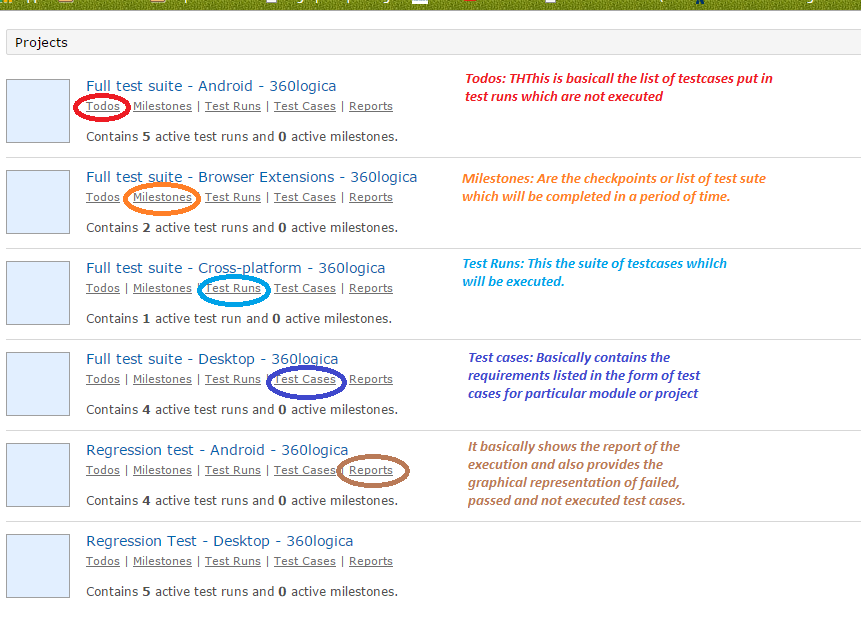
Now, please see the screenshot to analyze the basic modules for a particular project:
Basic Modules of a Project
We have to deal with test case creation and execution so we will go ahead with Test Cases and Test Runs:
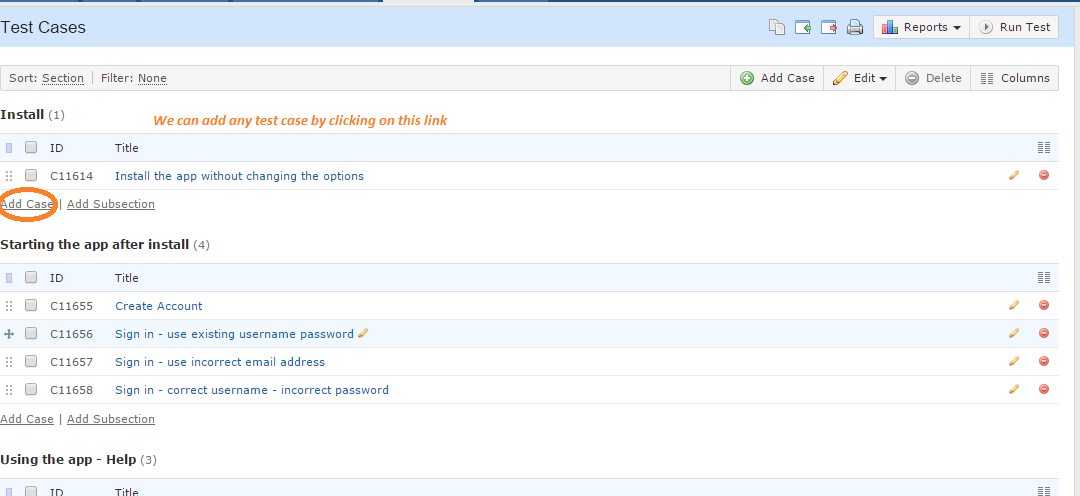
By clicking on the Project name the user will land on the page which contains the test cases for that project.
Test Cases List
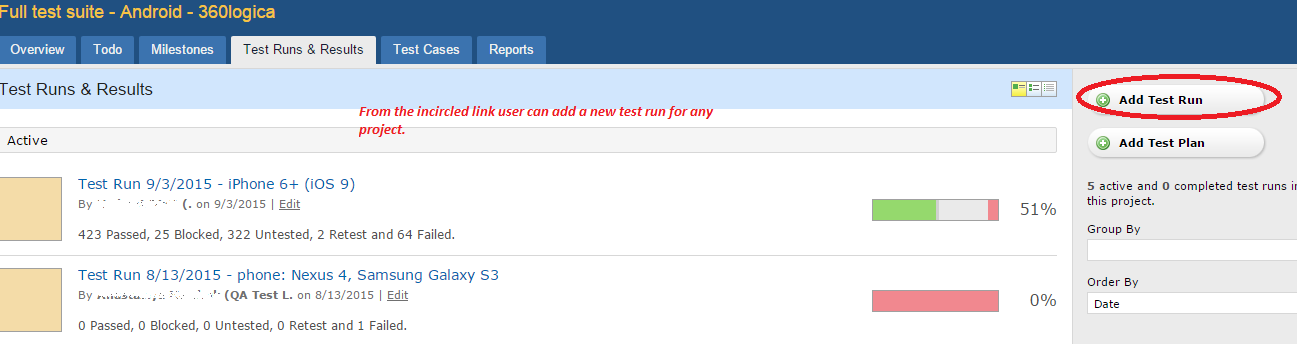
Now,  for executing the test cases of selected modules so users can just create a new test run for that and select all the test cases from the list of cases which he wants to execute:
Tests to execute
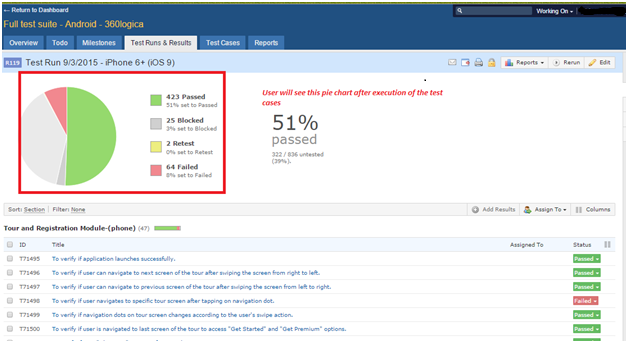
Now, after adding the test cases to a test run, comes the execution and bug reporting. Meanwhile, user can mark the status of test cases according to the test result:
Test case status
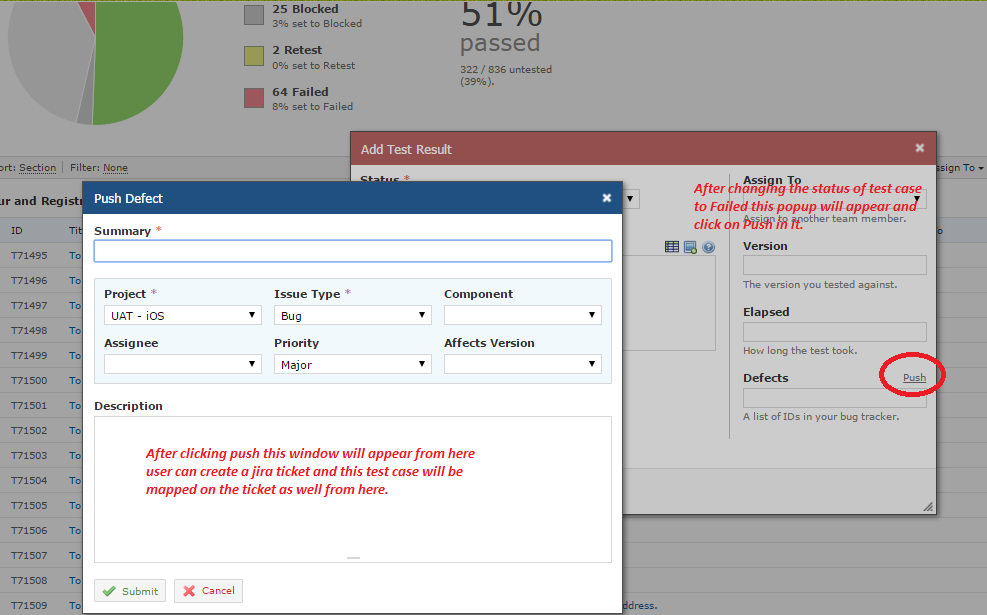
Now, if a test case fails, then users can create a JIRA ticket from Test Rail itself.
If a test case fails, then change the status corresponding to the case as Failed.
Thereafter, click on Push in the displayed popup. Then create a JIRA ticket from there so that the test case gets automatically mapped on the ticket.
Push defect
This is all the basic functionalities and uses of Test Rail.

Tuesday, December 22, 2015

GUI(Graphical User Interface) Testing


What is GUI ?
As we know, computer has two types of interfaces!
1. Command Line Interface - on typing text, computer responds to that command.
2. Graphical User Interface(GUI) - To interact with the computer using images rather than text.
Following are the GUI elements which can be used for interaction between the user and application:


Great, now we can proceed in testing GUI. But how? 
Here, is brief explanation of how and what is to be tested in GUI testing.
What is GUI Testing?
It is the process of testing an application GUI of the System Under Test. GUI testing involves checking the screens which has controls like menus, buttons, icons, and all types of bars – tool bar, menu bar, dialog boxes, windows, application fragments etc.
What do you Check in GUI Testing ?
The below are few points will fortify GUI Testing.
  • Verify all the GUI elements for size, position, width, length and characters or numbers accepted.
  • Verify you can execute the intended functionality of an application using GUI elements
  • Verify Error Messages are displayed correctly
  • Verify for Clear demarcation of different sections on screen
  • Verify Font used in application is readable
  • Verify the alignment of the text is proper
  • Verify the Colour of the font and warning messages is aesthetically pleasing
  • Verify that the images have good clarity
  • Verify that the images are properly aligned
  • Verify the positioning of GUI elements for different screen resolution.
GUI testing can be done through three ways:
Manual Based Testing
In manual based testing, graphical screens are checked manually by testers with the requirements stated in requirements document.


Record and Replay
GUI testing can be done using automation tools. This is done in 2 parts. During Record , test steps are captured into the automation tool. During playback, the recorded test steps are executed on the Application Under Test. Example of such tools – QTP .


Model Based Testing
A model is a graphical description of system’s behavior. It helps us to understand and predict the system behavior. Models help in a generation of efficient test cases using the system requirements. Following needs to be considered for this model based testing:
  • Build the model
  • Determine Inputs for the model
  • Calculate expected output for the model
  • Run the tests
  • Compare the actual output with the expected output
  • Decision on further action on the model
Some of the modeling techniques from which test cases can be derived:
  • Charts – Depicts the state of a system and checks the state after some input.
  • Decision Tables – Tables used to determine results for each input applied
Model based testing is an evolving technique for the generating the test cases from the requirements.Its main advantage, compared to above two methods, is that it can determine undesirable states that your GUI can attain.


Few Test Cases for GUI

  1. Testing the size, position, width, height of the elements.
  2. Testing of the error messages that are getting displayed.
  3. Testing the different sections of the screen.
  4. Testing of the font whether it is readable or not.
  5. Testing of the screen in different resolutions with the help of zooming in and zooming out like 640 x 480, 600 x 800, etc.
  6. Testing the alignment of the texts and other elements like icons, buttons, etc. are in proper place or not.
  7. Testing the colors of the fonts.
  8. Testing the colors of the error messages, warning messages.
  9. Testing whether the image has good clarity or not.
  10. Testing the alignment of the images.
  11. Testing of the spelling.
  12. The user must not get frustrated while using the system interface.
  13. Testing whether the interface is attractive or not.
  14. Testing of the scrollbars according to the size of the page if any.
  15. Testing of the disabled fields if any.
  16. Testing of the size of the images.
  17. Testing of the headings whether it is properly aligned or not.
  18. Testing of the color of the hyperlink.

Monday, December 21, 2015

How to install .apk in Android devices

Builds transfer

Builds can be transferred to/from android device to PC/Mac using USB cable or Wi-fi. To transfer files using USB cable, make sure UBS debugging is enabled in device.
Android file transfer for mac
  • Download & install Android File Transfer
  • Plug the device to Mac with a USB cable.
  • Android file transfer window should launch automatically.
  • Drag & drop builds to/from finder to transfer.
Android file transfer in PC:
  • Plug the device to PC using USB cable.
  • Device should be detected as a media device.
  • Open device in explorer & simply copy paste builds.

Build transfer through Wi-fi:

Files can be transferred over Wi-fi using apps from google play store.
Air Droid’ is a convenient one to use. Following are steps to transfer files through Air droid:
  • Install Air Droid from google play store.
  • Open Air Droid.
  • Open browser & enter address http://web.airdroid.com
  • When page opens, enter the code showed in device or scan QR code from the PC/Mac monitor.
  • Device will be connected to PC/Mac. Upload build to device from any location in PC/Mac.
Note: Device & PC/Mac should be in one Wi-fi network.
Install from unknown sources:
  • Before installing build, installation of app from unknown sources should be enabled in device.
  • To do so, enter settings/security.
  • From ‘Device Administration’ section, check on ‘Unknown Sources’.
Install builds from File Manager:
  • Installing build will require any file manager app. This app does not comes with OS bundle.
  • Download & install any free File Manager app from google play store.
  • Browse to the build location from file manager app.
  • Tap on the build.
  • Installation popup appear.
  • Tap ‘Install’ button & proceed.
  • Build is installed in device.

Installing builds from testflight:

  • From the device, open browser & go to https://testflightapp.com/androidsplash.
  • Download Testflight App for android.
  • After download & install, create an account or sign in with existing account to access available build. Note that to get a build, the testflight account should should be invited to the project.
Install builds from Testflight:
  • Launch TestFlight in device.
  • Available builds shows in the app.
  • Tap ‘Install’ button & confirm to install the build

Installing builds from ADB:

– Make sure you have installed Eclipse
– Make sure you have installed ADT plug-in
– Make sure you have installed ADB in your machine
– Make sure you have enabled USB debugging
1. Connect Android device to your Machine
2. Open terminal/command prompt
3. Enter command “adb devices” (to verify device is connected with your machine and remote quotes in command line)
4. Enter command “adb install <file name>” (remove text ‘File’ and run)

Sunday, December 20, 2015

How to Proxying Charles on Android or iOS Devices

Charles Proxy Configuration
Android:
  1. Enter Settings.
  2. Tap on Wi-Fi
  3. Tap & hold on the network you are connected.
  4. Tap Modify network.
  5. Check the Show advanced options.
  6. From Proxy settings dropdown, choose Manual.
  7. Set your system IP as Proxy hostname.
  8. Set a port that you use in charles tool to log (default: 8888).
  9. Save & Start your app.

iOS:
Enter Settings.
Tap on Wi-Fi.
Scroll down to see Proxy settings.
Tap on Http Proxy.
Set your system IP as Proxy hostname.
Set a port that you use in charles tool to log (Default: 8888).

NOTE:
- After starting app, application Charles running in PC/Mac will show warning for connection. Allow connection from the device. Application logs will appear in charles.
- If Charles show the API calls as Unknown, Install SSL certification file by hitting the link http://charlesproxy.com/getssl in mobile device and install the certificate file.
- After installing certificate right click on the required API host name and select Enable SSL proxying to view the data transaction of the API call.
- Make sure client (mobile) and charles proxy tool in system are connected to same Wifi network
- System IP can be found in two ways
1. Open terminal and enter ipconfig - Windows
enter ifconfig - iOS
2. In charles tool click on Help and select Local IP address

How to get device logs for Android Devices

USB Debugging:

To take android device log from PC/Mac, USB debugging should be enabled
in device. Following are the steps to enable USB debugging:
Enable USB Debugging in Android Devices
  • Go to Settings > About phone.
  • Then move on to Build number option
  • Tap on Build number repeatedly about 7 times.
  • After touching 7th time you will see a message that, you are now a developer.
  • Now the ‘Developer options’ will be placed in Settings menu.
  • Enter ‘Developer options’.
  • Check on ‘USB Debugging’.
  • Wanring popup ‘Allow USB debugging?’ will appear.
  • Tap ‘Ok’ to confirm.
USB debugging in Android 4.0 and Later
  • Go to settings.
  • Enter ‘Developer options’.
  • Check on ‘USB Debugging’.
  • Warning popup ‘Allow USB debugging?’ will appear.
  • Tap ‘Ok’ to confirm.
With USB debugging enabled, after connecting device to any PC/Mac, device will be connected as a media device.

Getting device log:

Logs from PC/Mac:
  • Download android SDK tools. Android SDK tools can be downloaded from here: http://developer.android.com/sdk/
  • In tools folder, there is a tool ‘monitor’. Open monitor.
  • Connect the device with PC/Mac. Make sure USB debugging is enabled in device.
  • Device will appear at top right ‘Device’ panel. Select the device (i.e. Nexus 5.1).
  • Device log should appear at the bottom ‘Logcat’ panel.
  • Device log can be filtered with log tag or other parameters.
  • Select the necessary logs.
  • Tap on ‘Save’ button to save.
  • Device log will be saved as text file.
As numerous logs are recorded, clearing logs after saving would save redundancy in saved logs.
Logs from device:
There are many apps to record device log in google play store. The app CatLog’ is a convenient one. Note that rooting might be required for devices to record logs using CatLog. Following are steps to record device log using CatLog:
  • Download ‘CatLog’ from google play store.
  • Open CatLog. Keep this app in background while testing app.
  • When device log needs to be saved, open CatLog.
  • Tap on android options button on device.
  • From these options device log can be saved in device or can be sent to =
    an email address as text file.

Run Android Apps in Chrome Browser in Windows, OS X and Linux

Unofficially, now it is possible to run any Android app in Chrome browser on Windows, Mac and Linux!! Here is how you can make it w...